
The ultimate oil pressure guide for the TFSI 2.0 EA113
TFSI 2.0 EA113 Oil pressure – Part 2
Feb
Part 2 of the ultimate oil pressure guide for the TFSI 2.0 EA113
In this second part of the oil pressure troubleshooting guide we will start working on the bottom end of the engine. I will not cover any specifics about the general work involved, tearing your engine down, because this varies between differnet models and can be found elsewhere on the internet.
You can even access VAG’s own workshop repair manuals for a small fee:
Let’s get started
OK, so in the first part of this series we measured the oil pressure and made some notes about its specifics and behavior. Now its time to put those to use. Regardless of which results we got, when it comes to the 2.0T FSI EA113, the starting point will always be the bottom end. Inside the oil pan are numerous prone to fail components, each of which has its own way of affecting the oil pressure. Even if your fault is not in this area, some of them should be checked in order to take preventive actions if needed.
Checks to be made while removing the oil pan
Leaking rear main seal
As you are working on your car to disassembly the oil sump, it is good to keep an eye out for leaks in between the engine and gearbox. If there is a lot of oil in this area, chances are that your rear main seal is defective and needs replacement. Even if this will not affect the oil pressure, it can cause other issues later on.
What state is your oil in?
When draining the old oil from your engine, you should use a clean container in order to evaluate the condition of the oil. What you want to check for is:
- Contamination in terms of small particles or grainy feeling
- Larger particles (check color and if they are magnetic)
- Smell (if there is a heavy smell of gasoline, keep track on you oil consumption. You may have an piston ring issue.)
With the oil pan removed
I am now assuming you have finished disassembling your oil pan and are looking up on the oil pump and balance shaft assembly.
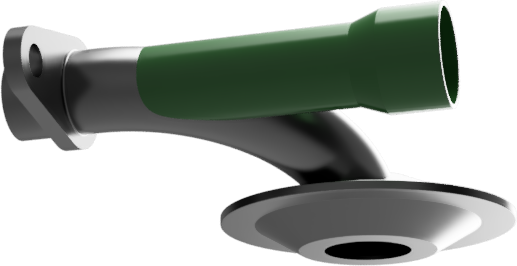
Oil suction pipe and strainer
The first thing to check here is the oil suction pipe, or pickup, to see if there is any debris blocking the strainer. This should be done before removing it because it can flush itself, once released from the oil pump.
Also note what type is installed in your car. Is it the old version without or the new one with the bypass inlet, highlighted in green. Both types can impact the oil pressure negatively under certain conditions. If it is the new typ, with the bypass, it will most likely not be your issue directly (unless the oil level was low). If it is the old type and it is blocked by debris or oil sludge, that might be part of the the cause. Indirectly both of these will affect the oil pumps regulating system in their own way, but I will get to that later on.
Oil pump transmission
The next thing to check is the transmission driving the oil pump and balance shafts. This is by far the most common issue leading to oil pressure loss when it comes to the EA113 engines. Mostly it can be spotted right away and many times you will even have seen larger metal pieces, from the chain and sprocket, in your oil.
Even if you do not find your issue here, you must still check the sprocket driving the balance shaft. Better yet would be to seize the opportunity to delete your balance shafts as a precaution. More about the subject of deleting the shafts can read HERE.
When inspecting the transmission, you should check for cracks in the sprocket on the left hand side, looking at the engine from the front. If the sprocket is broken apart you will also have to check for further damage to the one on the crankshaft and the chain connecting them. The separate oil pump sprocket will usually not be affected. If you find oil pump sprocket has failed, this will most likely be due to a seized oil pump, resulting in the notch on the shaft breaking.
End of part two
That’s it for this time! I think this is a good breaking point, since the next step will require some further disassembly.
Coming up next time…
In the next episode we will take a closer look at the oil pump and balance shaft assembly, as well as some more parts accessible once removing it.
As a true cliffhanger I can also announce that, for the first time ever we will reveal what’s wrong with the design of the regulating system, inside of the the oil pump.
Until then!
Hannes,
Another question.
Can you recommend me a way to install baffles in the oil sump?
Is there in the market any baffles kit that you can suggest without changing the oem oil pump as is almost brand new because I changed it when the engine damaged… (I previously had an issue when the engine starved and had to repair it…)
I want to guarantee no issues with that again.
Thanks,
JC
Hi,
if you have the frewwheel, it’s safe to raise the oil level a bit instead.